


Everything You Need to Know About the Pitcher Breast Milk Storage Method

Last Updated: 28 March 2025

Breastfeeding and pumping come with their fair share of challenges, and finding an efficient system for storing and organizing milk can feel overwhelming. Enter the Pitcher Method—a game-changing approach that simplifies breast milk storage while maximizing convenience, consistency, and efficiency. Whether you’re an exclusively pumping mom, combining breastfeeding with pumping, or just looking for ways to streamline your milk storage routine, the Pitcher Method offers a practical solution tailored to your busy lifestyle.
This guide dives deep into everything you need to know about the Pitcher Method, from understanding how it works and its safety, to exploring the benefits and addressing potential concerns. You’ll also find step-by-step instructions to implement this method successfully, ensuring that your milk storage is as seamless and stress-free as possible.
Whether you’re a first-time mom or a seasoned pro, the Pitcher Method might just be the answer to simplifying your milk storage routine while ensuring your baby gets the best nutrition possible. Let’s get started!
What is the Pitcher Method?
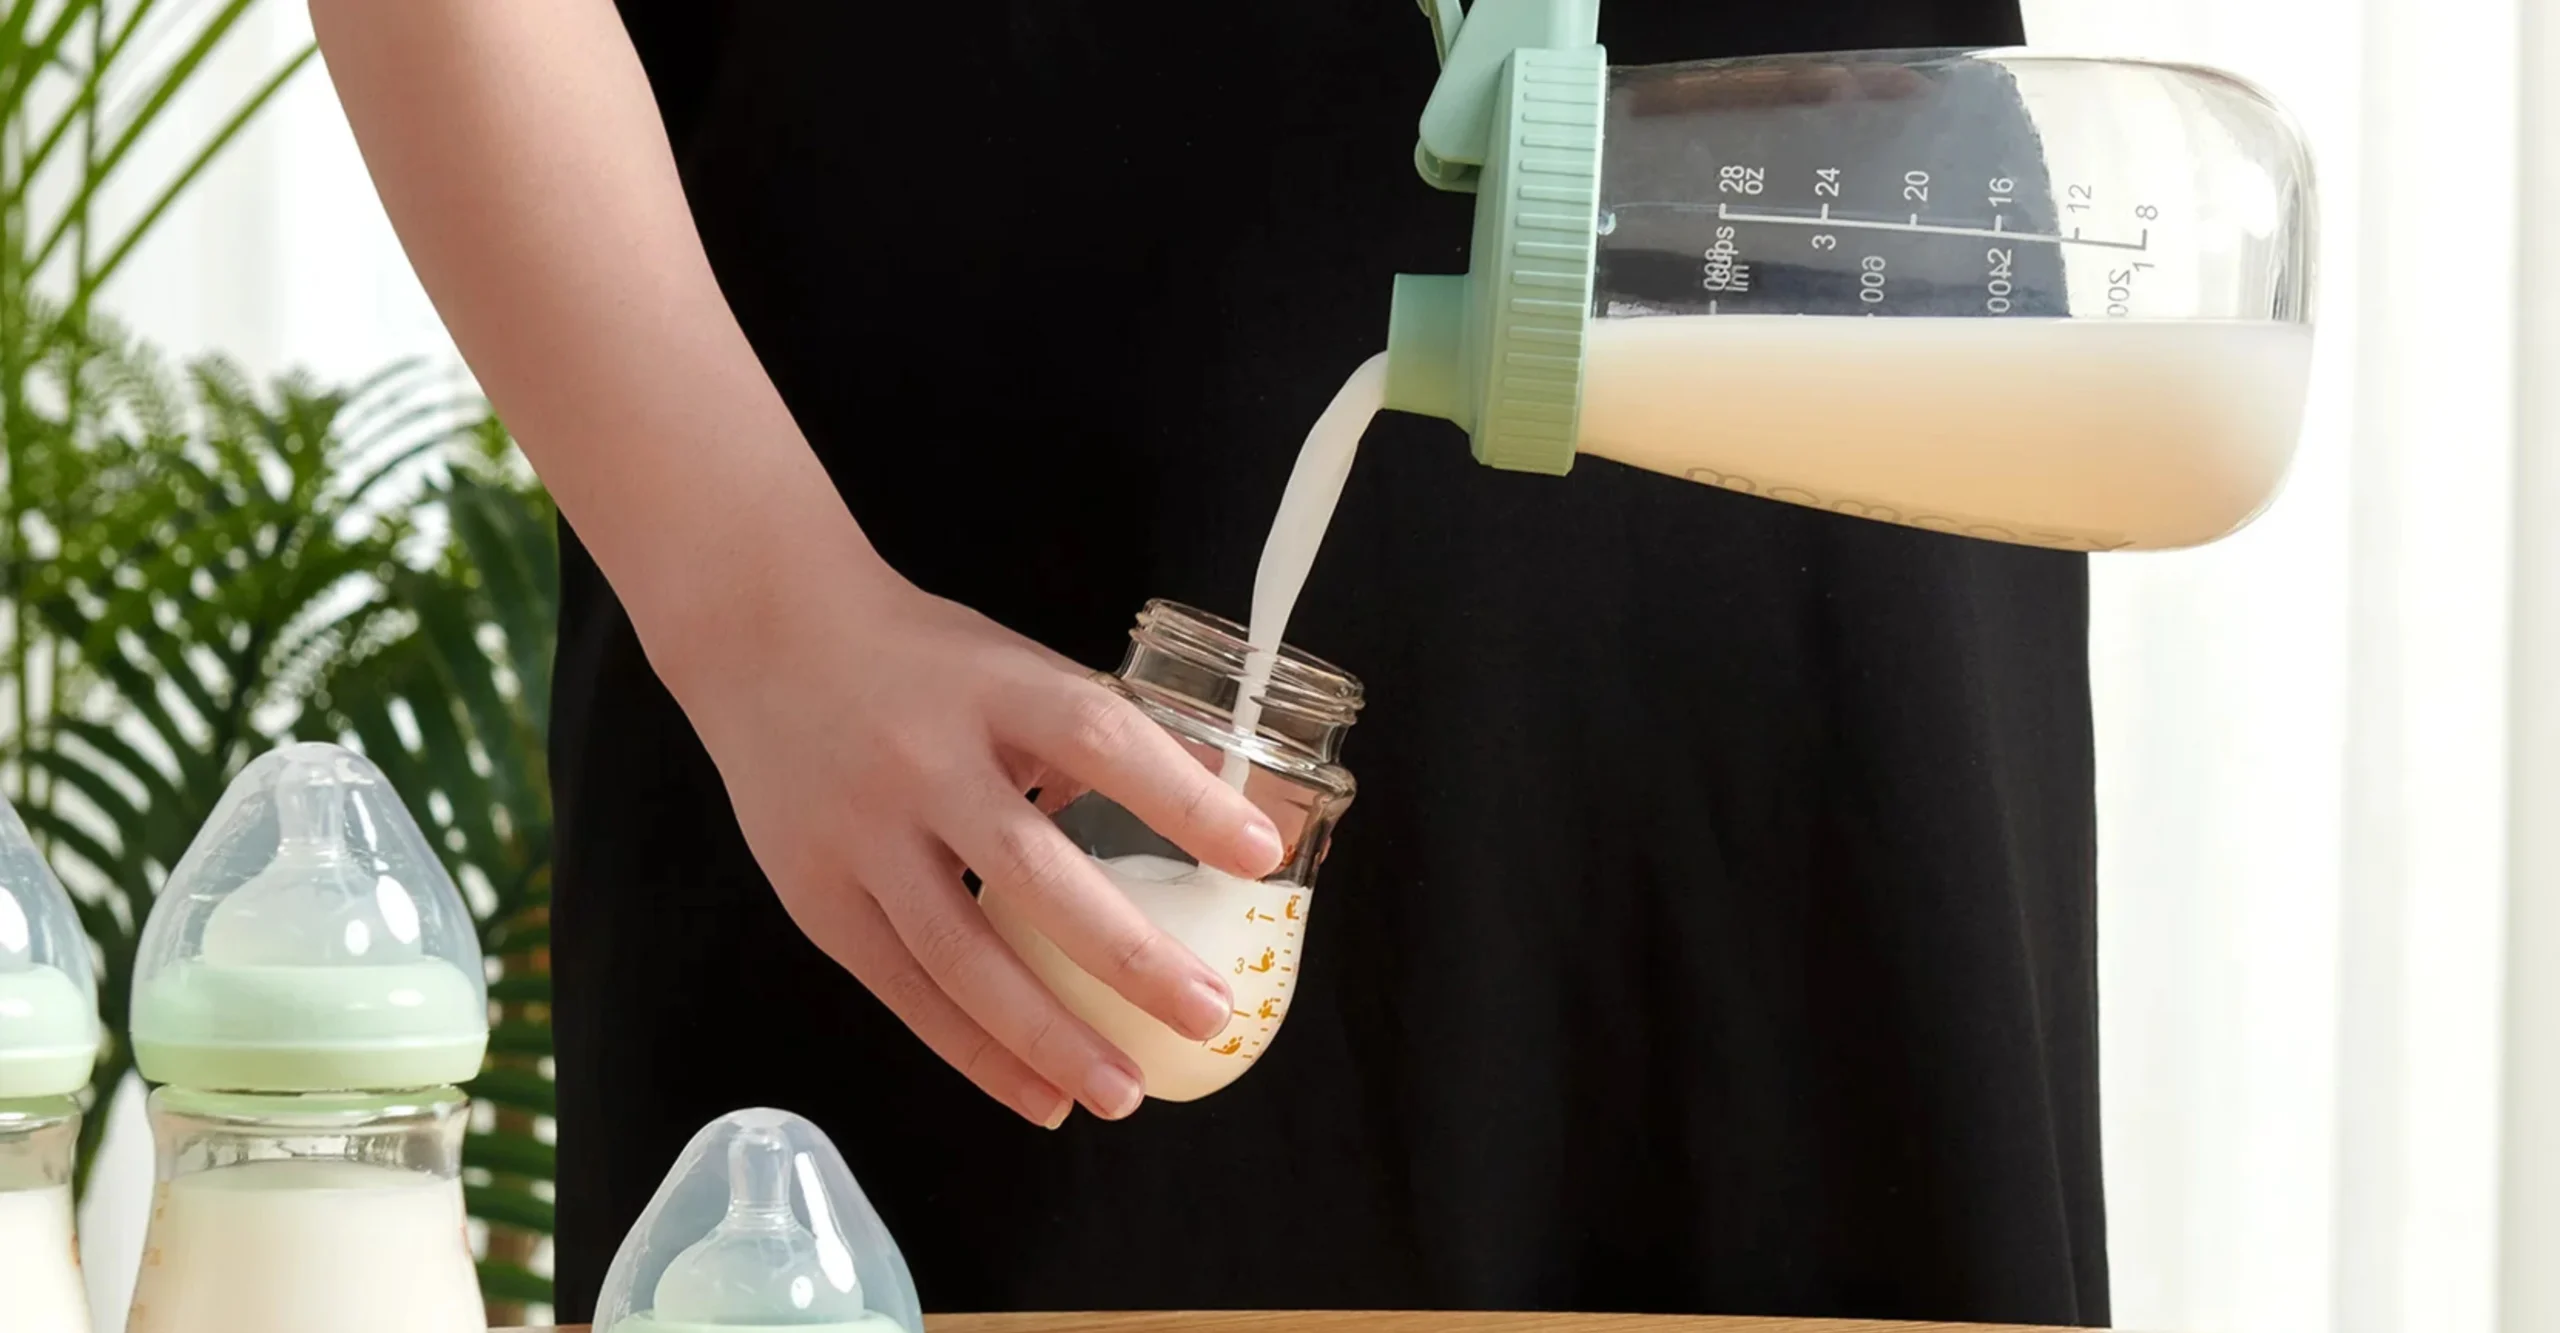
The Pitcher Method is a practical, no-fuss approach to breast milk storage that’s perfect for busy moms looking for an efficient routine. At its core, it’s all about simplicity: you take all the milk you pump over a 24-hour period and store it in one central, refrigerated container. This could be a literal pitcher, a mason jar, or any food-safe container that works for you. Once the day’s supply is collected, you can prep bottles for the next day or freeze any extra milk to build your stash.
One of the best things about the pitcher method is how flexible it is! Some moms use big jars for their super milk supply, while others stick with smaller containers. Whatever size you go for, it’s still considered “the pitcher method” as long as you’re pooling milk into one container.
When it comes time to portion the milk, you simply pour it into bottles as needed. Just remember, freshly pumped milk lasts up to four days in the fridge, so you’ve got plenty of time to work with. Whether you’re prepping bottles for the next day or planning to freeze some milk for later, the pitcher method takes the guesswork out of breast milk storage and helps make your routine a breeze.
Is the Pitcher Method Safe ?
Yes, the pitcher method is safe! Many health experts support pooling pumped breast milk, though some raise concerns about mixing warm milk with cool milk. The idea is that adding freshly expressed, warm milk to already chilled milk might briefly raise the temperature of the stored milk, potentially encouraging bacterial growth. That sounds worrisome, but here’s the good news: there’s no solid research to back this theory.
If you’re still cautious, you can take a simple extra step: chill freshly pumped milk in the fridge before adding it to the main container. In 2021, the American Academy of Pediatrics (AAP) updated their guidelines, allowing for the mixing of warm and cold pumped milk. They even recommend pooling milk pumped within a 24-hour period to help even out the variability in nutrients due to pumping time or breast emptying
That said, like many things related to women and breastfeeding, the pitcher method hasn’t been as thoroughly researched as it should be. However, based on current knowledge and studies, pooling milk is considered safe when done properly. Here’s the key: make sure your fridge is set to 4 degrees Celsius or colder, wash your pitcher or container thoroughly, and transfer or use your milk within an maximum four days. By following these guidelines, there’s no reason why the pitcher method shouldn’t be a safe and effective way to manage your breast milk.
What Are the Benefits of the Pitcher Method?
Balances Milk Composition
One of the key benefits of pooling breast milk using the Pitcher Method is the ability to create a more consistent nutrient profile for your baby. Breast milk’s fat and energy content can vary naturally throughout the day and even within a single pumping session. By combining milk from multiple sessions into one container, you balance these variations, ensuring that each feeding offers a uniform mix of nutrients, especially fat and calories.
Fat content in breast milk gradually increases during a nursing or pumping session, which means milk collected during letdown or early in a session might be lower in fat compared to milk expressed later. Pooling milk helps even out these fluctuations, ensuring each bottle provides a consistent fat content. This balance can make feedings more satisfying for your baby, as the fat helps balance milk sugars and promotes a feeling of fullness.
While beneficial for all babies, this approach can be particularly important for preterm infants or those with specific nutritional needs. For preemies, whose growth and development depend on precise macronutrient intake, the consistent fat and caloric content achieved through pooling milk can make a significant difference.
Saves Time and Space
One of the biggest advantages of the Pitcher Method is its ability to save time and space. By pumping into one set of collection bottles and transferring all the milk into a single pitcher, you reduce the number of bottles that need to be washed and stored. This simplifies the cleaning routine, freeing up time for other priorities. Additionally, since all milk is stored in one container, you can easily portion out the right amount for feedings or freezer storage without dealing with multiple bottles or bags. For moms who produce more milk than their baby consumes, the method helps keep things organized and ensures milk is dated and used in a timely manner.
Another space-saving benefit is the reduced clutter in your refrigerator. Instead of juggling several bottles or bags, the pitcher method uses vertical fridge space more effectively. This is a game-changer for pumping moms with limited fridge storage. Fewer containers also mean less risk of milk being shuffled to the back of the fridge and forgotten, preventing the heartbreak of wasted “liquid gold.”
Eco-Friendly and Cost-Effective
Many moms appreciate that the Pitcher Method is both eco-friendly and budget-friendly. By pooling milk into reusable containers like glass mason jars, you can significantly reduce the need for single-use plastic storage bags. This is especially appealing for those aiming to minimize their environmental footprint. Glass jars, in particular, have an added benefit: breast milk fat is less likely to stick to the sides compared to plastic containers, ensuring your baby gets every precious drop of nutrients.
Using the pitcher method also means fewer storage bags to purchase. Instead of a bag for each pumping session, you’ll only need a few for freezing any leftover milk. Moms who combine this method with reusable silicone storage bags see even greater savings over time.
It's a Systsem
The pitcher method takes the guesswork out of feeding and storage. When you pool milk from multiple sessions into a single container, you don’t have to worry about dating individual bottles or remembering which to use first. Preparing the next day’s feedings becomes systematic: pour the milk from the pitcher into bottles, and you’re good to go. This organised approach also eliminates the stress of finding expired bottles or old milk in the fridge.
For moms who like to stay on top of their dishes, this method fits perfectly. With fewer bottles to clean, you can wash as you go, preventing a pileup of dishes at the end of the day. This is especially convenient for busy working moms who need a streamlined system for pumping and storing milk during the day and transporting it home in a single container.
Partner and Caregiver-Friendly
The pitcher method isn’t just convenient for moms—it’s also a hit with partners and caregivers. Having a single container of milk ready for bottle preparation makes their job much easier. There’s no need to combine multiple small bags of milk or guess which bottle to use first. Everything is ready and waiting, ensuring that feedings go smoothly and your baby is well-fed without added stress.
What are the potential downsides of the Pitcher Method?
Risk of losing all breastmilk if the container leaks or is damaged
Whoever said, “Don’t cry over spilled milk,” clearly never spilled a pitcher full of priceless breast milk! One significant downside to milk pooling is the risk of losing an entire day’s supply if the container leaks, is damaged, or becomes contaminated. Losing a whole pitcher of milk can feel devastating, especially after all the effort that goes into pumping.
To mitigate this risk, choose your storage container wisely. While traditional pitchers are convenient, many don’t have fully sealing lids, increasing the risk of spills. Mason jars with flip-top lids are a great alternative—they’re easy to pour from and can often be sealed more securely. Even with the best container, though, extra care is necessary when handling your liquid gold, especially once the lid is open.
Requires transfer of collected milk every 24-hours
While breast milk stored in the refrigerator at a temperature below 4°C can remain fresh for up to four days, it’s generally recommended to transfer pooled milk within 24 hours for optimal safety and quality. This recommendation helps minimise the risk of bacterial growth and ensures that the milk maintains its nutritional integrity.
Keeping milk in the pitcher longer than 24 hours can increase the chances of contamination, especially as the pitcher is opened and closed repeatedly for additions or bottle preparation. While you technically have some leeway with the four-day freshness guideline, it’s best practice to transfer your milk daily—whether into individual bottles for feedings or storage bags for freezing.
Altered levels of time-sensitive hormones
One of the fascinating aspects of breast milk is its dynamic nature—it changes composition throughout the day to meet your baby’s needs. For example, breast milk produced at night contains higher levels of melatonin, a hormone that promotes relaxation and helps regulate sleep-wake cycles. In contrast, milk expressed in the morning tends to have higher levels of cortisol, a hormone that supports alertness and activity. However, more research is needed to fully understand the implications of these variations and how practices like the Pitcher Method, which involves pooling milk from different times of the day, might affect these dynamics.
If you’re concerned about maintaining the balance of sleep-related hormones, you could experiment with separating your milk into two cycles: a daytime pitcher and a nighttime pitcher. Adjust the cycle to a 12-hour schedule, with one pitcher designated for milk expressed during the day (e.g., 6 a.m. to 6 p.m.) and another for milk expressed at night (e.g., 6 p.m. to 6 a.m.). Using Pitchers in different colours can make this system even easier to manage, helping you quickly identify which pitcher to use at any given time.
How to Successfully Implement the Pitcher Method
What You Need
- 1–2 Pitcher Jugs or Jars – Use these to pool your milk throughout the day.
- Whiteboard Marker – Label your jugs with the date and/or AM/PM. You can also label prepped baby bottles for added organization.
- Breast Milk Storage Bags – Essential for freezing extra milk for long-term storage.
- Permanent Marker – Use to label breast milk storage bags with the date and/or AM/PM before placing them in the freezer.
- Extra Breast Pump Bottles (optional) – These are very helpful if you plan to chill milk before adding it to the pitcher.
- 5–6 Baby Bottles (optional) – Great for prepping baby feeds in advance to minimize washing and sterilizing throughout the day.
Step 1: Pump
Pump your milk as you normally would, using bottles or containers that fit directly onto your pump.
Step 2: Chill (Optional)
If you’re concerned about mixing warm milk with chilled milk, place your freshly pumped milk in the fridge to cool before adding it to the pitcher.
To do this efficiently, it’s best to have a few sets of bottles that are compatible with your pump. After each pumping session, After every pump, simply stop by the fridge, store the fresh milk to chill, and transfer the already-cooled milk to the pitcher. This system allows you to keep your milk at the right temperature while maintaining a smooth flow and routine.
Step 3: Add Milk to Your Pitcher
Pour your cooled or freshly pumped milk into the storage pitcher. This combines milk from different pumping sessions, ensuring you have a consistent nutrient mix.
Step 3: Repeat
Continue adding milk from each pumping session to the same pitcher throughout the day. You can do this for a 12-hour cycle if you want to keep daytime and nighttime milk separate, or for a full 24 hours if you prefer to pool all milk together.
Step 3: Prep & Store
After 24 hours, it’s time to sort and store your milk. Here’s what to do:
- Prep Bottles: Pour milk from the pitcher into bottles for the next day’s feedings. Prepping bottles in advance can save time and reduce stress during busy feeding moments.
- Freeze Extras: Transfer any leftover milk to freezer-safe bags or bottles. Be sure to label each container with the date and/or AM/PM to track when it was collected.
While you don’t have to prep bottles in advance, doing so can help avoid confusion about which pitcher to add fresh milk to and prevent accidental waste. A daily routine of prepping bottles and processing milk simplifies feeding and storage and washing up, keeping your routine streamlined and stress-free
FAQs
What do I do with leftover milk in a bottle after feeding?
Milk left in a bottle after feeding can be used within 2 hours if kept at room temperature. After that, it should be discarded for safety reasons and should not be returned to the pitcher.
What can I Use as a Pitcher
A food-safe container, such as a pitcher, mason jar, or large storage bottle with a sealing lid, works well. Look for BPA-free options and containers that are easy to clean. A spout can make pouring milk into bottles easier.
How long can I store milk in the pitcher?
Breast milk can be safely stored in the refrigerator for up to 4 days at or below 4°C . To ensure freshness and safety, transfer milk to bottles or freezer bags within 24 hours if pooling over multiple days.
Can I pool milk from multiple days?
It’s recommended to limit pooling to one 12–24 hour period. If milk from multiple days is pooled, always label the pitcher with the date of the oldest milk, and ensure it is used or frozen within the 4-day guideline.
Do I need to sanitise the pitcher daily?
Yes, it’s best to clean and sanitise your pitcher daily to prevent contamination. Use a dishwasher with a sanitize function, boil it, or use steam sterilisers if the material is safe for high heat.
The Pitcher Method is more than just a breast milk storage technique—it’s a tool for simplifying your pumping journey and reclaiming valuable time and energy. By pooling milk, you can ensure consistent nutrition for your baby, streamline bottle prep, and reduce the clutter and hassle of traditional storage methods. Whether you’re managing a full milk supply, balancing work and parenthood, or simply looking to make feeding more efficient, the Pitcher Method adapts to your needs.
While there are considerations to keep in mind, such as maintaining hygiene and managing time-sensitive hormones, the benefits of this method far outweigh the potential drawbacks for most moms. With a little preparation and the right tools, the Pitcher Method can transform your milk storage routine into a more manageable, stress-free process.
Parenting is full of challenges, but with the Pitcher Method, breast milk storage doesn’t have to be one of them. Try it out, customise it to your unique routine, and enjoy the convenience it brings to your breastfeeding journey!
Our Guidance Pledge
We’re dedicated to providing you with practical, evidence-based information to help you make the best choices for your growing family. All content is medically reviewed by our in-house doctor and/or experts such as OB-GYNs, doulas, and midwives, and is based on the latest international guidelines, peer-reviewed studies, and reputable sources from academic institutions and medical journals. Learn More
Sources
-
Stellwagen, L. M., Vaucher, Y. E., Chan, C. S., Montminy, T. D., & Kim, J. H. (2013). Pooling expressed breastmilk to provide a consistent feeding composition for premature infants. Breastfeeding medicine : the official journal of the Academy of Breastfeeding Medicine, 8, 205–209. https://doi.org/10.1089/bfm.2012.0007
-
Mitoulas, L. R., Kent, J. C., Cox, D. B., Owens, R. A., Sherriff, J. L., & Hartmann, P. E. (2002). Variation in fat, lactose and protein in human milk over 24h and throughout the first year of lactation. British Journal of Nutrition, 88(1), 29–37. doi:10.1079/BJN2002579
-
Häusler, S., Lanzinger, E., Sams, E., Fazelnia, C., Allmer, K., Binder, C., Reiter, R. J., & Felder, T. K. (2024). Melatonin in Human Breast Milk and Its Potential Role in Circadian Entrainment: A Nod towards Chrononutrition?. Nutrients, 16(10), 1422. https://doi.org/10.3390/nu16101422
-
Cohen Engler, A., Hadash, A., Shehadeh, N., & Pillar, G. (2012). Breastfeeding may improve nocturnal sleep and reduce infantile colic: potential role of breast milk melatonin. European journal of pediatrics, 171(4), 729–732. https://doi.org/10.1007/s00431-011-1659-3
-
Pundir, S., Wall, C. R., Mitchell, C. J., Thorstensen, E. B., Lai, C. T., Geddes, D. T., & Cameron-Smith, D. (2017). Variation of Human Milk Glucocorticoids over 24 hour Period. Journal of mammary gland biology and neoplasia, 22(1), 85–92. https://doi.org/10.1007/s10911-017-9375-x
